How to Monitor a RAID Array Using Intel® RAID Web Console 2 (Intel® RWC2) on an In-Production VMware ESXi*-Based Server
What am I seeing?
I'm unable to monitor a RAID array from a Windows Virtual Machine running in a VMware ESXi* server.
What is included in the environment?
- Hardware Intel® RAID Controllers
- VMware ESXi (5.0, 5.5, 6.0, 6.5) already installed and in production
How to fix it:
You can use the Intel® RAID Web Console 2 (Intel® RWC2) to monitor a RAID array on a VMWare ESXi* server, however, it cannot be installed on ESXi* directly. You can install Intel® RWC2 on a remote or virtual machine running Windows* or Linux*.
| Note | Intel® RAID Web Console 2 is end-of-life and replaced by Intel® RAID Web Console 3 (Intel® RWC3). While most of the information and steps described in this article applies to Intel® RWC3, you can also refer to the Intel® RWC3 installation guide for details. |
Considering that ESXi* is already installed and in production, proceed as outlined below:
Verify that the hostname is not localhost. If the hostname of your machine is already different, make sure to write it down as you are going to need it later on. If you have not changed it, you need to:
- Press <F2> to enter the Customize System/View Logs. Authentication is required. Enter the root password.
- Scroll the arrows to Configure Management Network. The current hostname and IP address are displayed on the right side of the screen. Press <Enter> key to enter the network management configuration.
- Scroll the arrow to DNS configuration. Current DNS configuration information is displayed on the right side of the screen. Press key to the DNS configuration screen.
- Scroll the arrow to Hostname, and then enter the new hostname.
- Press <Enter> key to exit the DNS configuration. A restart is required. Press <Enter> key to save the changes.
After you change the hostname, you need to enable to ESXi Shell and ESXi SSH:
- The default status of the ESXi Shell is disabled as is shown in the figure below:

- Press <Enter> key to enable the ESXi Shell.
- The default status of the ESXi SSH is disabled as is shown in the figure below:

- Press <Enter> key to enable the ESXi SSH.
After you verify that the requirements mentioned above are met, download and install RWC2 on the remote Windows* machine that you will use to monitor the RAID.
You can find the VMWare* driver for your Intel® RAID Controller from VMWare*.
Next, download and install the SMI-S Provider on the ESXi machine.
After you have downloaded the file, unzip it and open the vib20/lsiprovider path. The LSI_bootbank_lsiprovider_xxx.xx.Vx.62-xxxx.vib (the x is actually a number that varies depending on the .vib file version) is needed shortly.
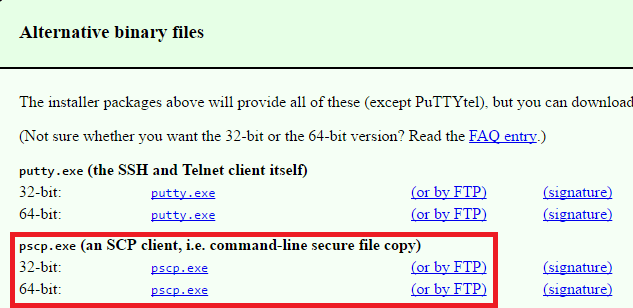
Download pscp.exe from the Download PuTTY page. See the example below:
- Copy both pscp.exe and LSI_bootbank_lsiprovider_xxx.xx.Vx.62-xxxx.vib into the root of an empty USB flash drive. Access the Windows Virtual Machine where Intel® RAID Web Console 2 was installed and mount the USB flash drive, open the Windows Command Prompt, and change to the directory of the USB flash drive.
- Transfer the LSI Provider.vib file on client to the server using the pscp.exe LSI_bootbank_lsiprovider_xxx.xx.Vx.62-xxxx.vib root@192.168.1.200:/ command, where root is the logon user name of the ESXi server and 192.168.1.200 is the ESXi server IP. The password of the server is required during the transference. See the example below:

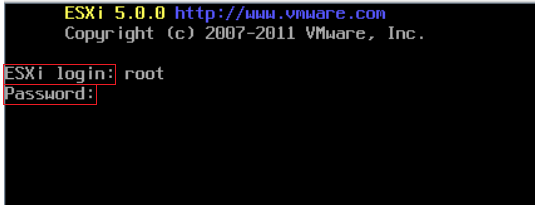
- Go to the ESXi Server. Press <Ctrl+F1> to enter the shell mode in ESXi. The user name and password are required.
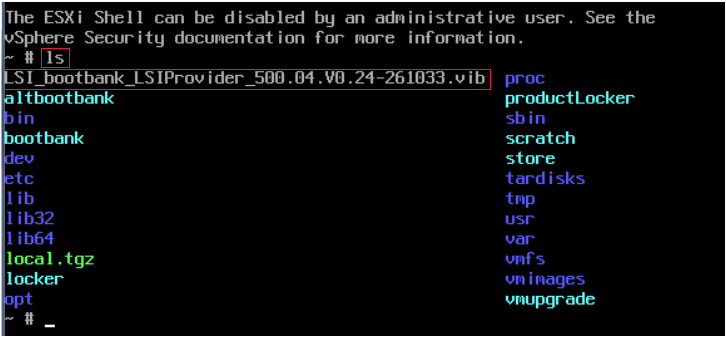
- Use the ls command to show the contents of the root directory in ESXi. You can find the LSI Provider.vib file.
- Enter the esxcli software vib install -v / LSI_bootbank_lsiprovider_xxx.xx.Vx.62-xxxx.vib --force --maintenance-mode command to install the LSI Provider on ESXi.

- Reboot the ESXi after installing the LSI Provider.
After rebooting the ESXi, you need to change the client host file:
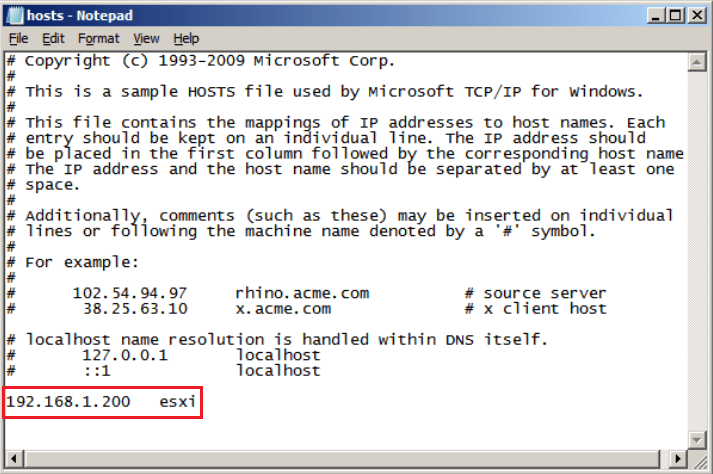
- Open the hosts file on client: Disk C-->Windows-->System32-->drivers-->etc-->hosts.
Edit the host file by adding the server information as is shown in figure below. 192.168.1.200 is the IP address of the server in the local network, and ESXi (or the name of the host if it is a different one) is the server hostname. The hostname is case insensitive.
| Note | In some scenarios where the network requires domain authentication, that domain should be included as well. |
- Save the host file. Restart the system a couple of times.
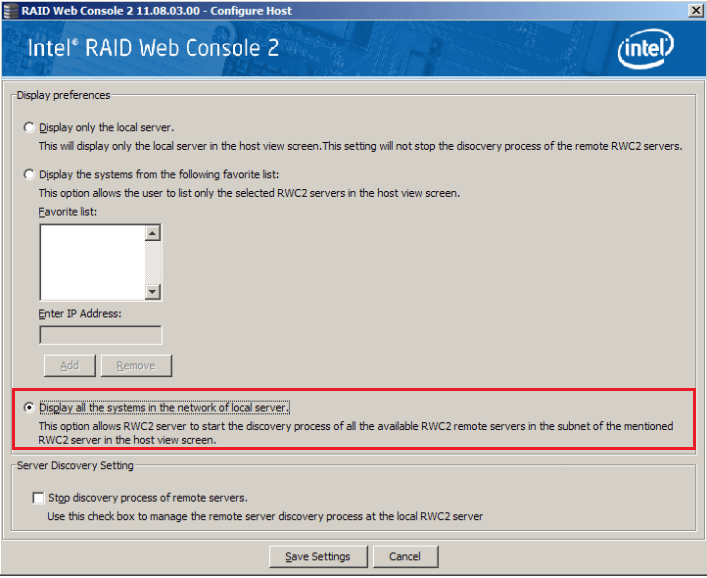
- Double-click the Intel® RAID Web Console 2 and open it. Click Configure Host. Choose Display all the systems in the network of local server, uncheck the Stop discovery process of remote servers box, and then click Save Settings to save the configuration as is shown in the figure below:
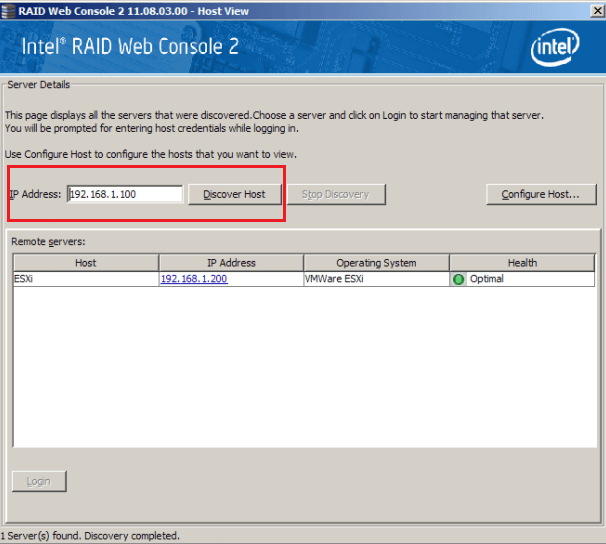
- Enter the IP Address of the server in Intel® RAID Web Console 2 and click Discover Host to search the host Intel® RAID Controller. The IP address of the server is returned. Double-click the IP address of the server to connect the Intel® RAID Controller.
- Enter the User Name and Password of the server and click Login to enter Intel® RAID Web Console 2 on the server.
Consider that the ESXi tips and tricks documents are a reference for this short guide. You can access the document at any time.
| Note | Any third party link in this article is being offered for your convenience and should not be viewed as an endorsement by Intel of the content, products, or services offered there. |