Overview
CAM-Visualizer provides a GUI-based OS independent app for Intel® Distribution of OpenVINO™ toolkit classification models that allows you to view feature activation and class activation maps, given an input image, up to an individual layer level in an intuitive and interactive GUI mode. CAM-Visualizer offers two capabilities:
- View feature activations with respect to each layer and class prediction weightage from an input image influenced by a particular layer.
- CAM activation shows areas of input image via an attention heatmap contributing to a prediction. The tool supports two open-source pixel-level attribution methods, Score-Cam and SimpleCam (an inference variation of SmoothGrad) that are ported to Intel® Distribution of OpenVINO™ toolkit. The tool is written in Python* with Intel® Distribution of OpenVINO™ toolkit as backend and thus is portable to any system having support for these two.
Select Configure & Download to download the reference implementation and the software listed below.
- Time to Complete: Approximately 30 minutes
- Programming Language: Python* 3.8 or higher
- Available Software: Intel® Distribution of OpenVINO™ toolkit 2022.1
Target System Requirements
- Intel® Core™ i5 processor or above with 16 GB of RAM
- Ubuntu* 20.04 LTS, or Microsoft* Windows* 10
- Docker* version 20.10 or higher
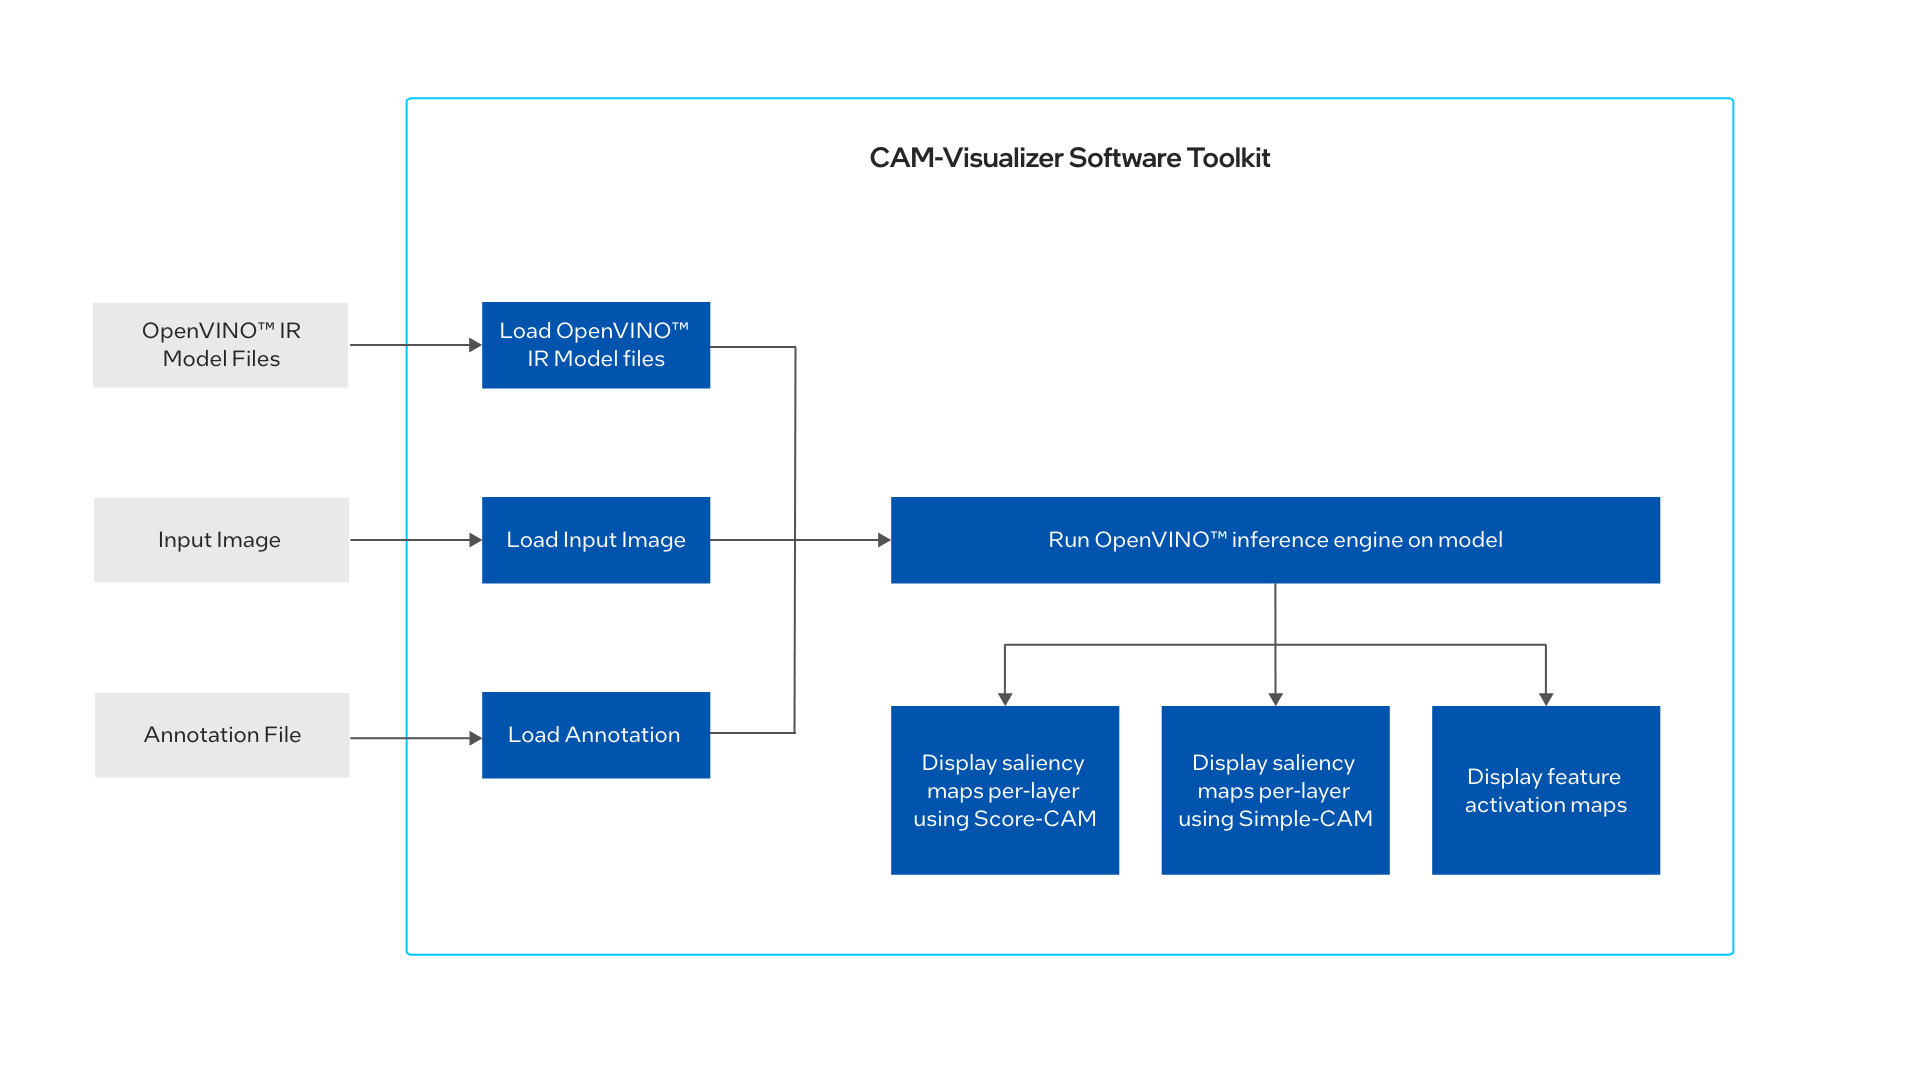
How It Works
The application uses the inference engine included in the Intel® Distribution of OpenVINO™ toolkit. The reference implementation shows an example of how saliency maps can be leveraged in OpenVINO™-based classification applications, including industrial quality inspection.
Components of the inference module include:
- Class Activation Maps using Score-CAM: This approach is a port of the open-source ScoreCAM gradient free CAM calculation method to run natively in OpenVINO™ for computer vision classification workloads with performance optimizations. Learn more about Score-CAM.
- Class Activation Maps using Simple-CAM: The Simple-CAM approach is a variation of the Smooth-grad approach for inference, involving computation of the mean value across all activations in a layer to generate 2D heatmap. This approach provides quicker saliency map results, but lower quality results compared to the Score-CAM algorithm, and does not provide segmentation per class.
For visualization of class activation maps outputted by both Score-CAM and Simple-CAM: Color heatmaps, where the heatmap is superimposed on the image, may be generated, as well as masked heatmaps where the heatmap is superimposed on the image as a segmentation mask. - Class Activation Maps using Grad-CAM for TensorFlow*: This approach is a port of the open-source Grad-CAM method to run for TensorFlow. Learn more about Grad-CAM.
NOTE: CAM-Visualizer only supports TensorFlow models with .h5 format with embedded model architecture. - Feature Activation Maps: CAM-Visualizer outputs the individual feature activation maps in gray-scale, in color (superimposed on the image), and in a histogram depicting the distributions of the individual activations.
Get Started
Step 1: Install the Reference Implementation
Select Configure & Download to download the reference implementation and then follow the steps below to install it.
- Open a new terminal, go to downloaded folder and unzip the package.
unzip class_activation_map_visualizer.zip - Go to class_activation_map_visualizer/ directory.
cd class_activation_map_visualizer/ - Change permission of the executable edgesoftware file.
chmod 755 edgesoftware - Run the command below to install the Reference Implementation.
./edgesoftware install - During the installation, you will be prompted for the Product Key. The Product Key is contained in the email you received from Intel confirming your download.
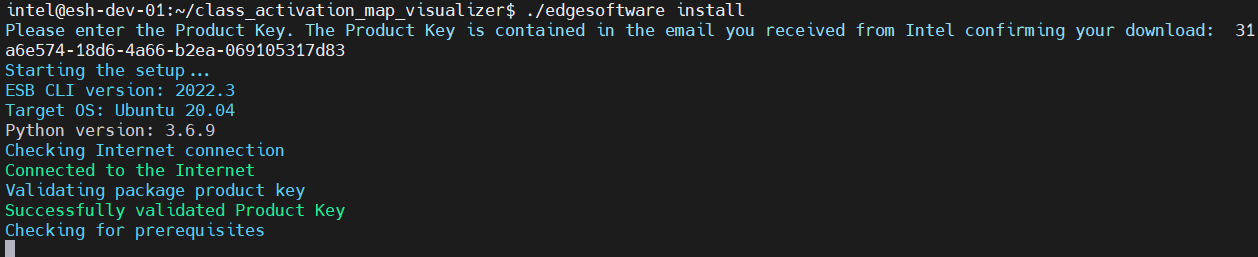
Figure 3: Product Key
- When the installation is complete, you will see the message “Installation of package complete” and the installation status for each module.
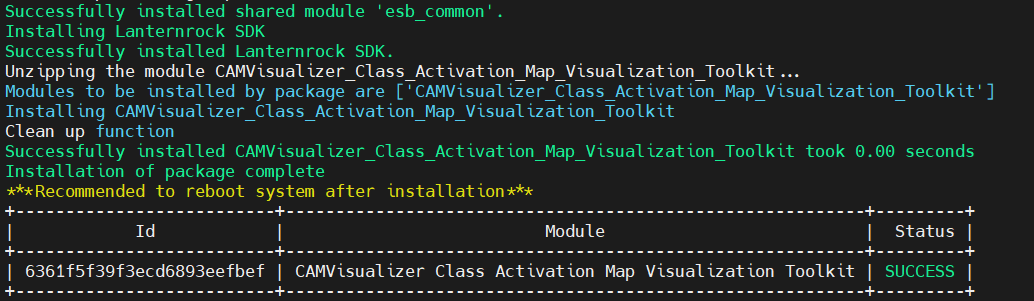
Figure 4: Installation Success
Step 2: Installation Requirements (One-Time)
Option 1: Set up a Docker Environment
The Intel® Distribution of OpenVINO™ toolkit Docker image has the required backend components. You must have Docker installed on your system before you complete the steps below.
Linux*
- Build the Docker image with the command:
docker build --no-cache --tag openvino_camviz:2022 --file Dockerfile . - Run the CAM-Visualizer Docker container. You can modify the following examples according to your system setup.
# Example 1: docker run -it --rm -e DISPLAY=$DISPLAY -v /tmp/.X11-unix:/tmp/.X11-unix -v /home/user/mapped:/camviz --name openvino_camviz openvino_camviz:2022 # Example 2: docker run -it --rm --device /dev/dri/ -e DISPLAY -v /tmp/.X11-unix:/tmp./X11-unix -v /dev/shm:/dev/shm -v /home/user/mapped:/camviz --name openvino_cam openvino_camgui:latest - Install the requirements:
pip install -r requirements.txt - Navigate to the /mapped/... folder using the Docker container command prompt and follow the steps outlined in the next section.
Windows*
To set up a Docker environment on a Windows host, we recommend using Windows Subsystem for Linux (WSL) 2.0.
Regardless of whether you are setting up a Docker Environment, if you are setting up WSL, follow steps 1-3 to get the Tkinter GUI up and running.
Skip steps 1-3 if your WSL version is build 21364 or higher. For details, refer to this WSL guide.
- Install an X11-application, such as VcXsrv, on your Windows host and use Xlaunch to start the application.
- In your WSL terminal, run the following command:
export DISPLAY=$(echo $(grep nameserver /etc/resolv.conf | sed 's/nameserver //'):0.0) - Install x11-apps:
sudo apt-get install x11-apps - Build Docker image:
docker build --tag openvino_camgui:latest --file Dockerfile . - Run the container:
docker run -it --rm -e DISPLAY -v /dev/shm:/dev/shm -v YOUR_PATH_HERE:/camgui --name openvino_cam openvino_camgui:latest - Install the requirements:
pip install -r requirements.txt
NOTE: If you see an error similar to: Could not find a version that satisfies the requirement openvino==2022.2.0
run this command: python3 -m pip install --upgrade pip
Option 2: Set up a Python Virtual Environment
Linux
- Run the below command to create a local Python virtual environment and install necessary packages:
source ./setup_env.sh - Run the following command to activate the Python environment:
source ./activate_env.sh
Windows
Run the following commands:
python3 -m venv camviz_env
camviz_env\Scripts\activate.bat
python3 -m pip install --upgrade pip
pip install -r requirements.txt
Run the Application
You can run the application with the GUI or with the console.
Use the GUI
Start the application with the command:
python camgui/camgui.py
To run inference on a single test image, follow the instructions below.
Run Inference with Class Activations
- Load Model:
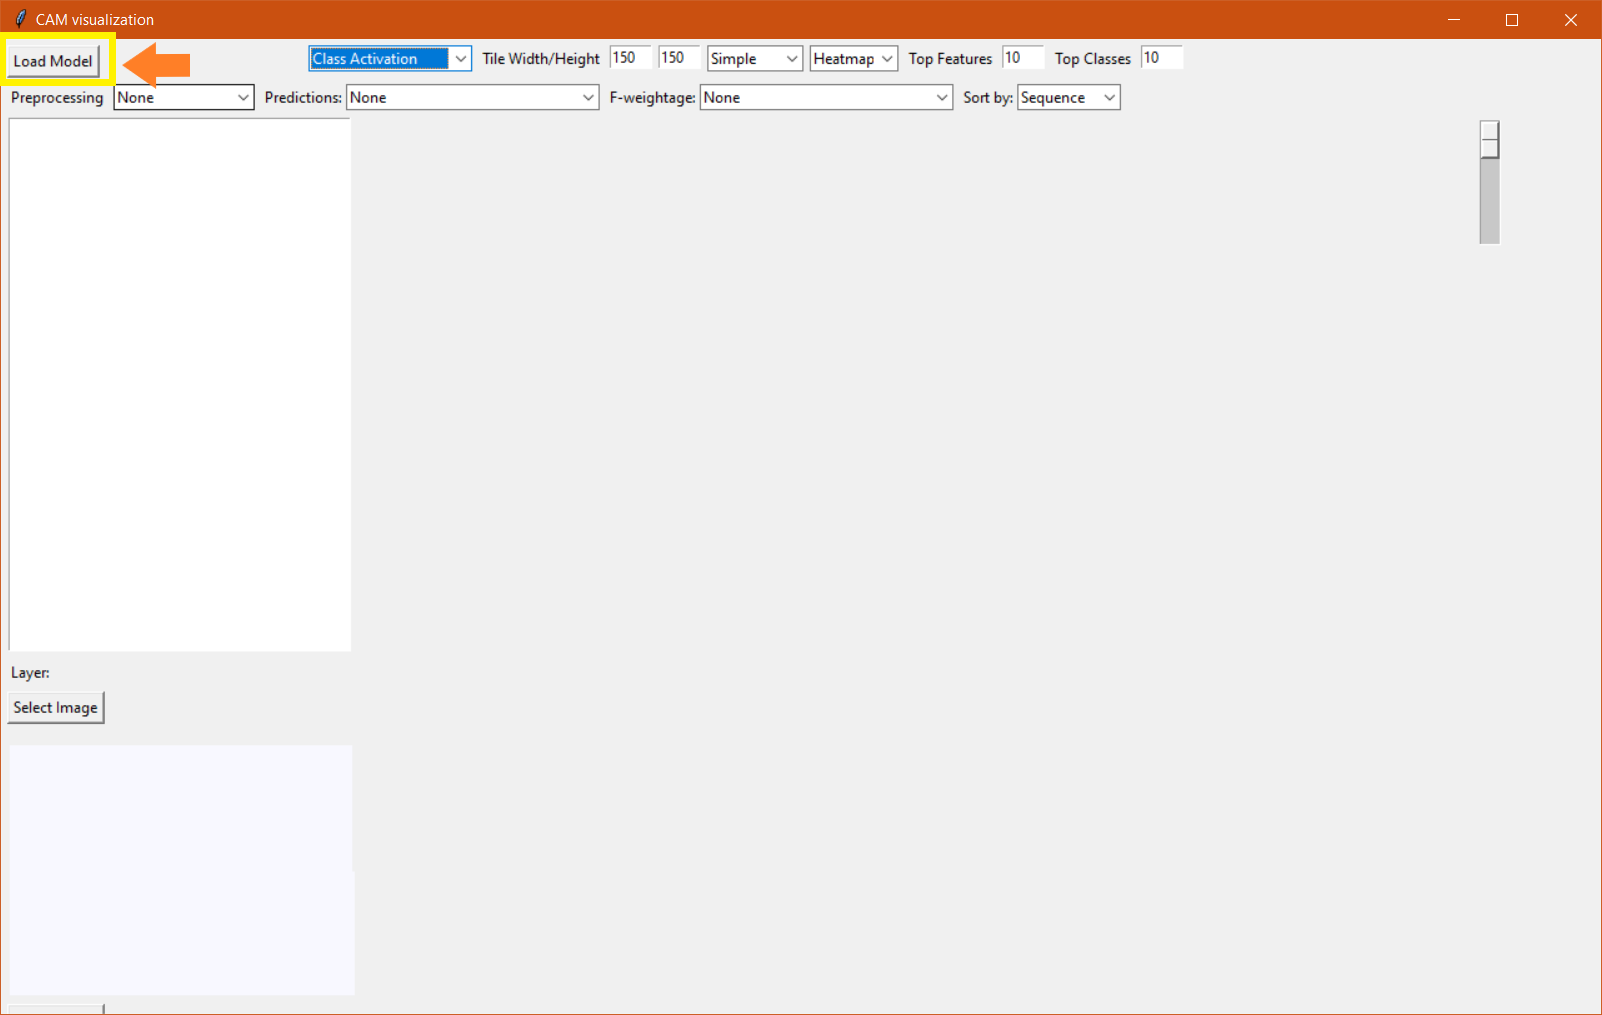
Figure 5: Load Model
- A pop-up window will open. Choose a supported OpenVino™ / TensorFlow model:
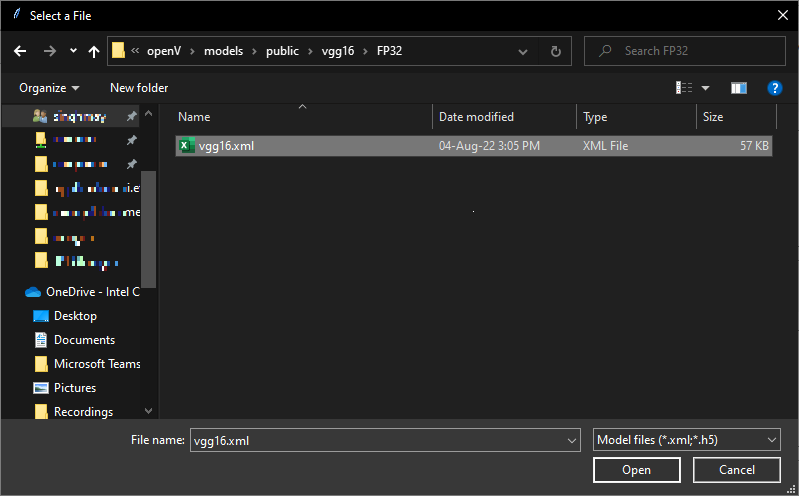
Figure 6: Choose a Supported Model (1 of 2)
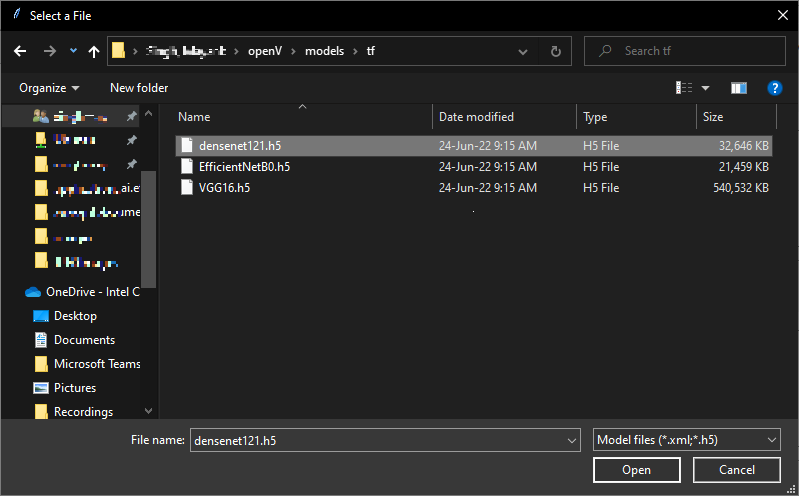
Figure 7: Choose a Supported Model (2 of 2)
- Model layers are shown in the list box:
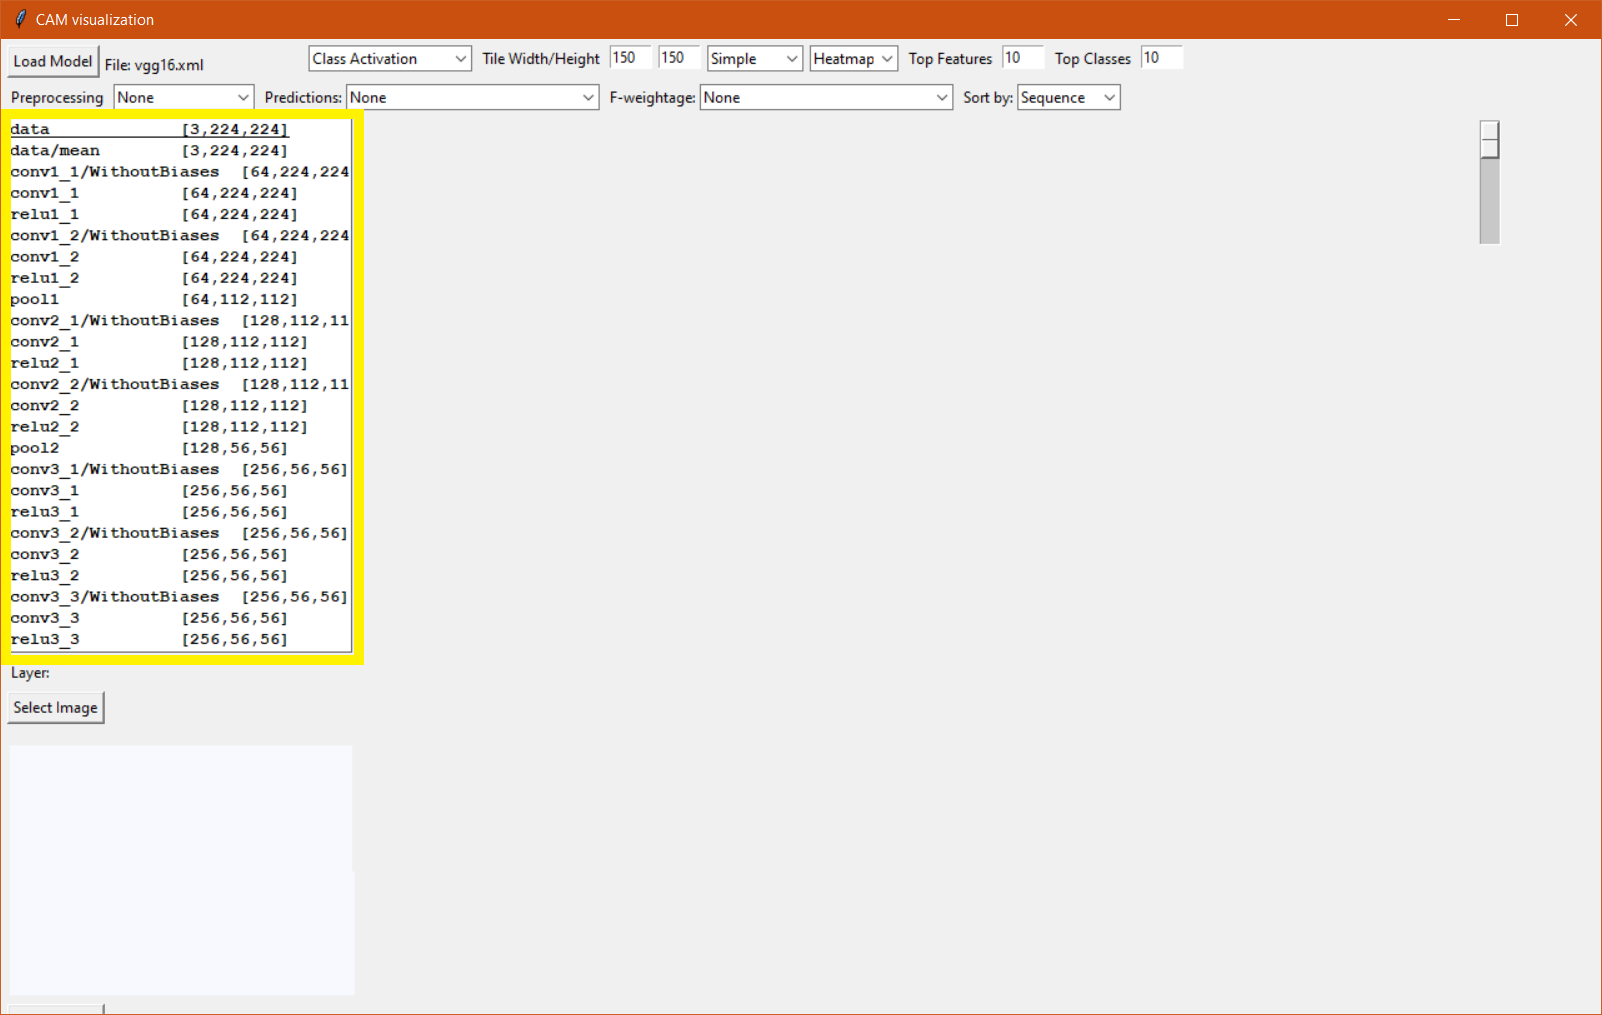
Figure 8: View Model Layers
- Select image:
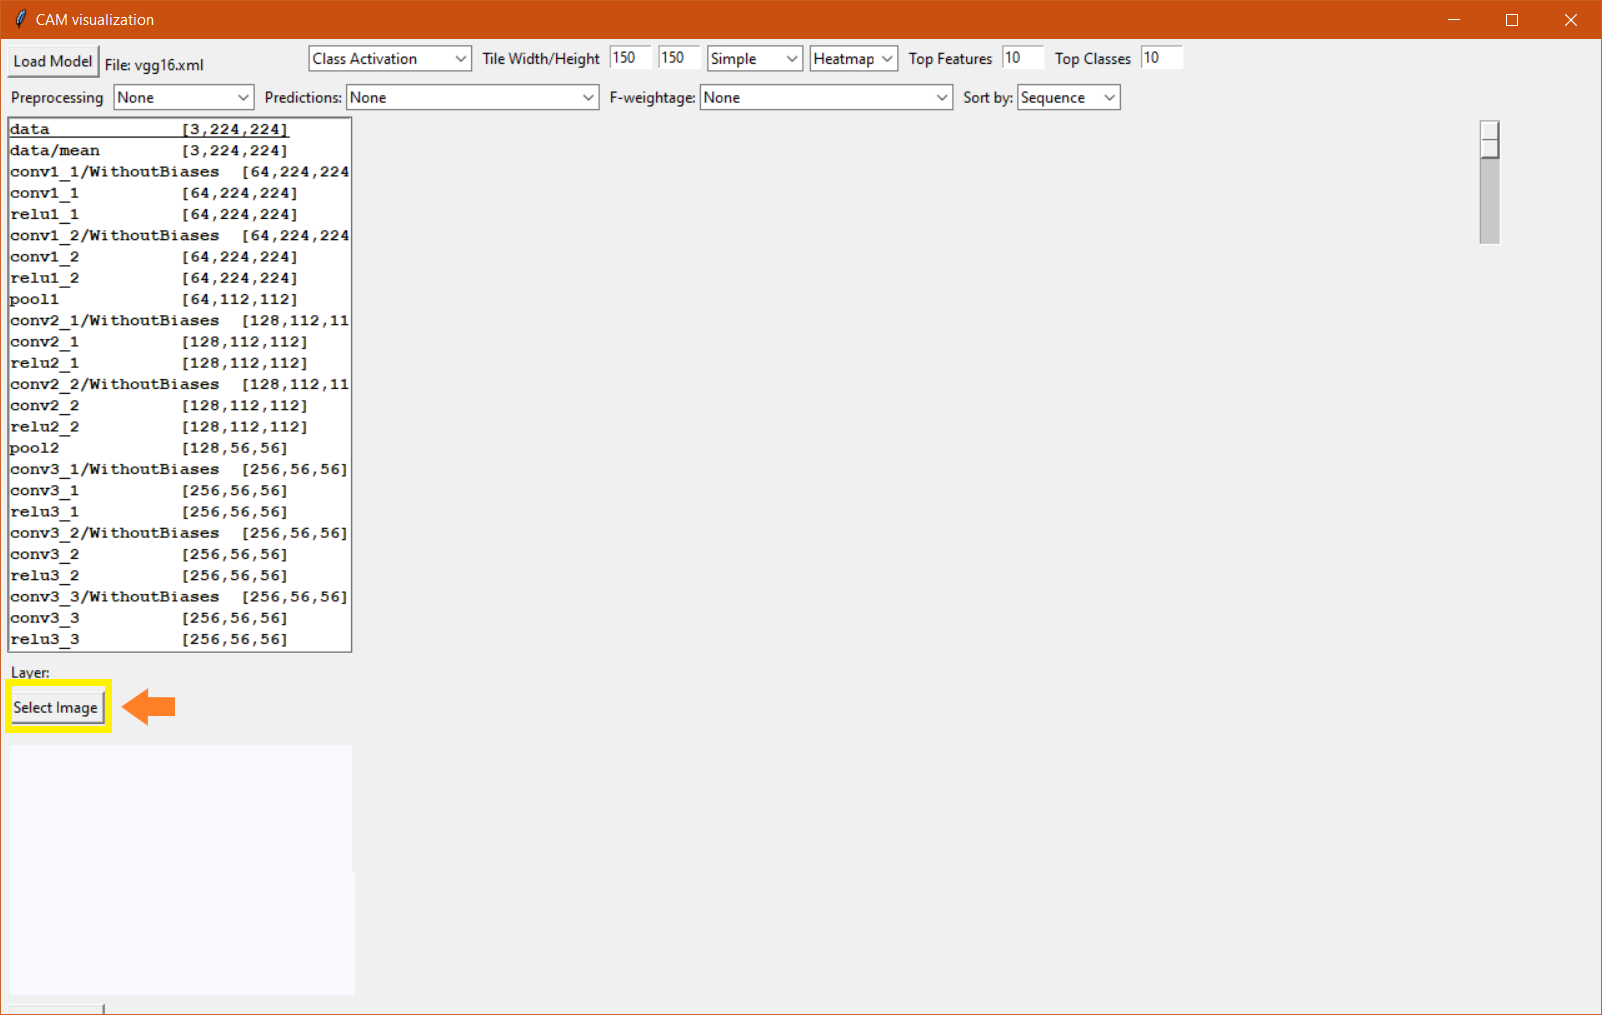
Figure 9: Select Image
- Select Preprocessing Mode:
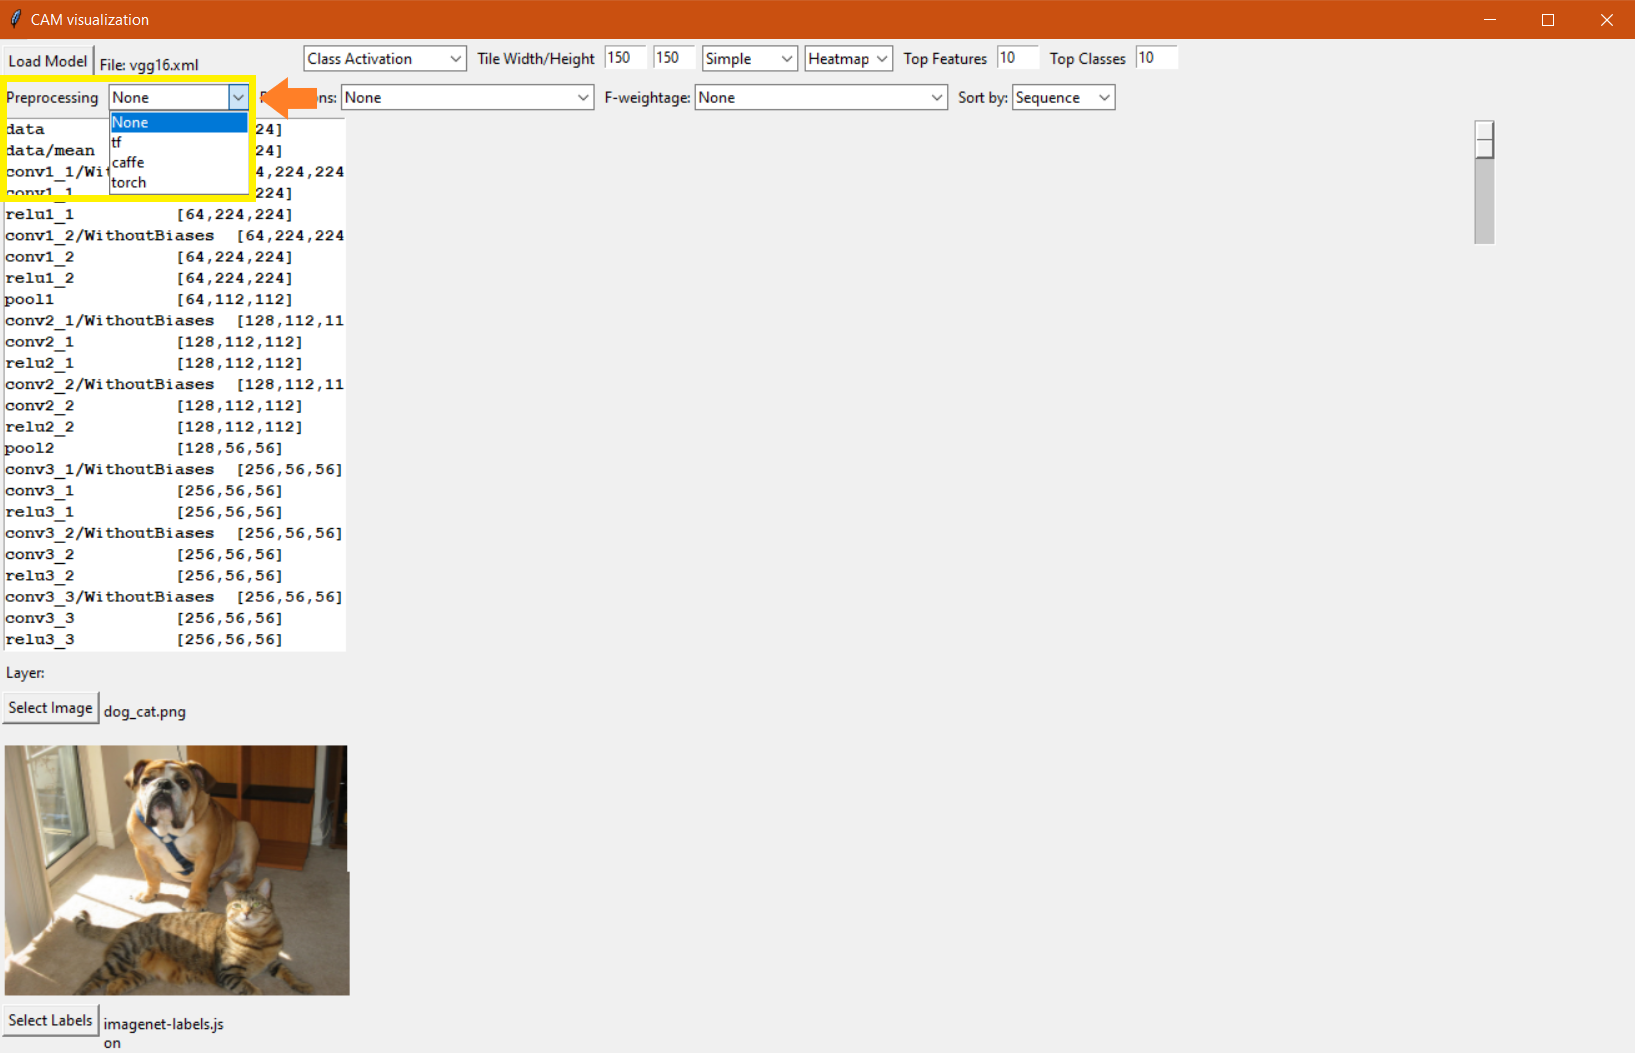
Figure 10: Select Preprocessing Mode
- Select Activation Type:
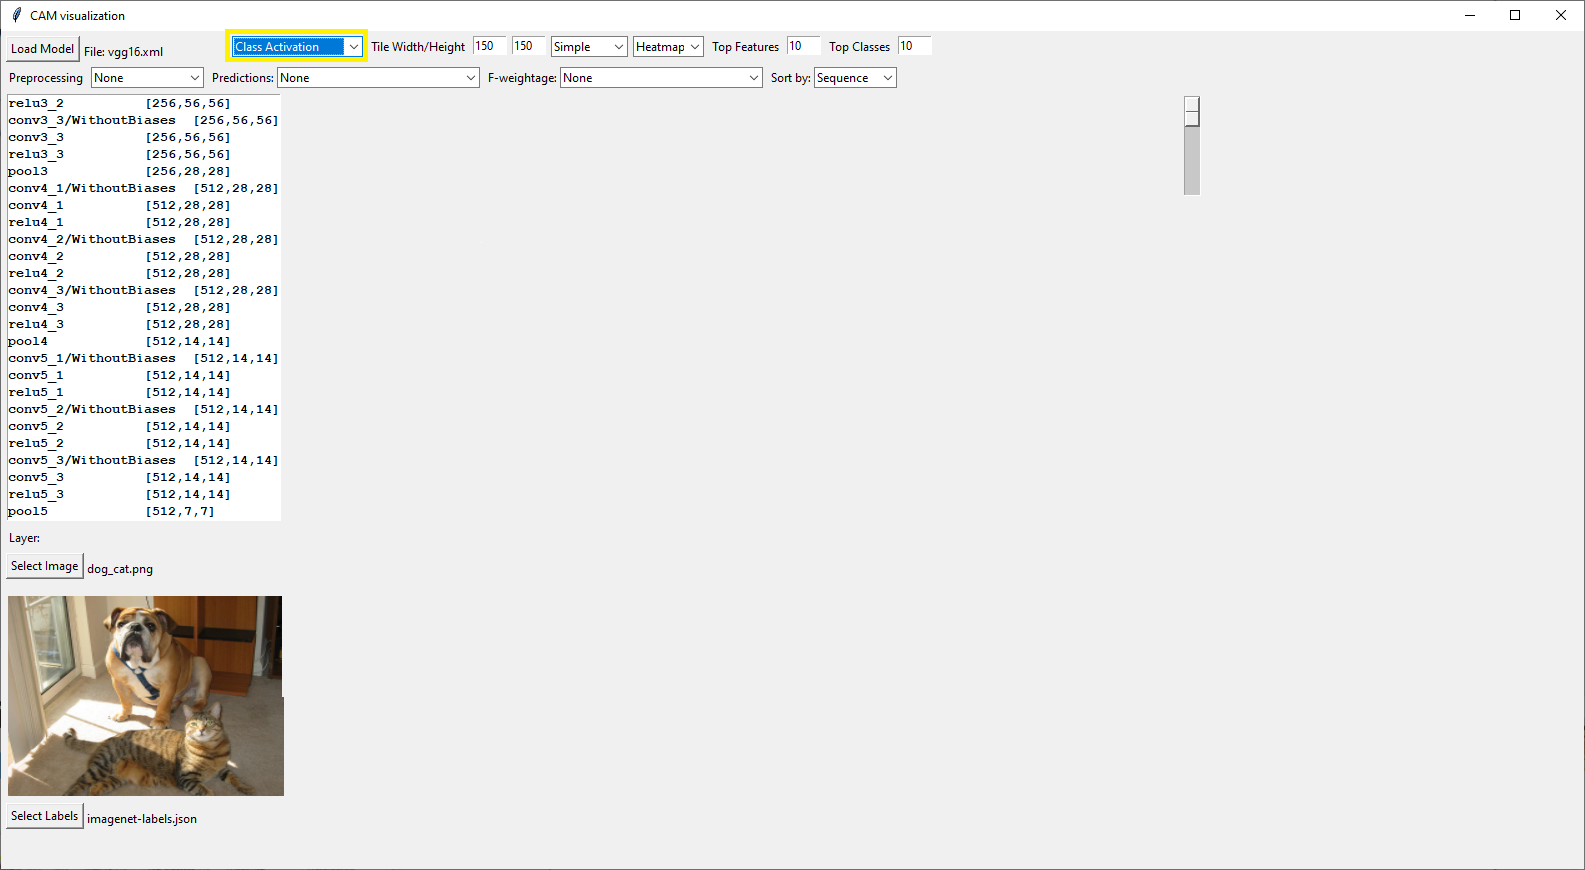
Figure 11: Select Activation Type
- Select CAM Type. These can be (for Class Activation Type only):
- OpenVINO™: Score-CAM or SimpleCAM
- TensorFlow: Score-CAM, SimpleCAM, GradCAM
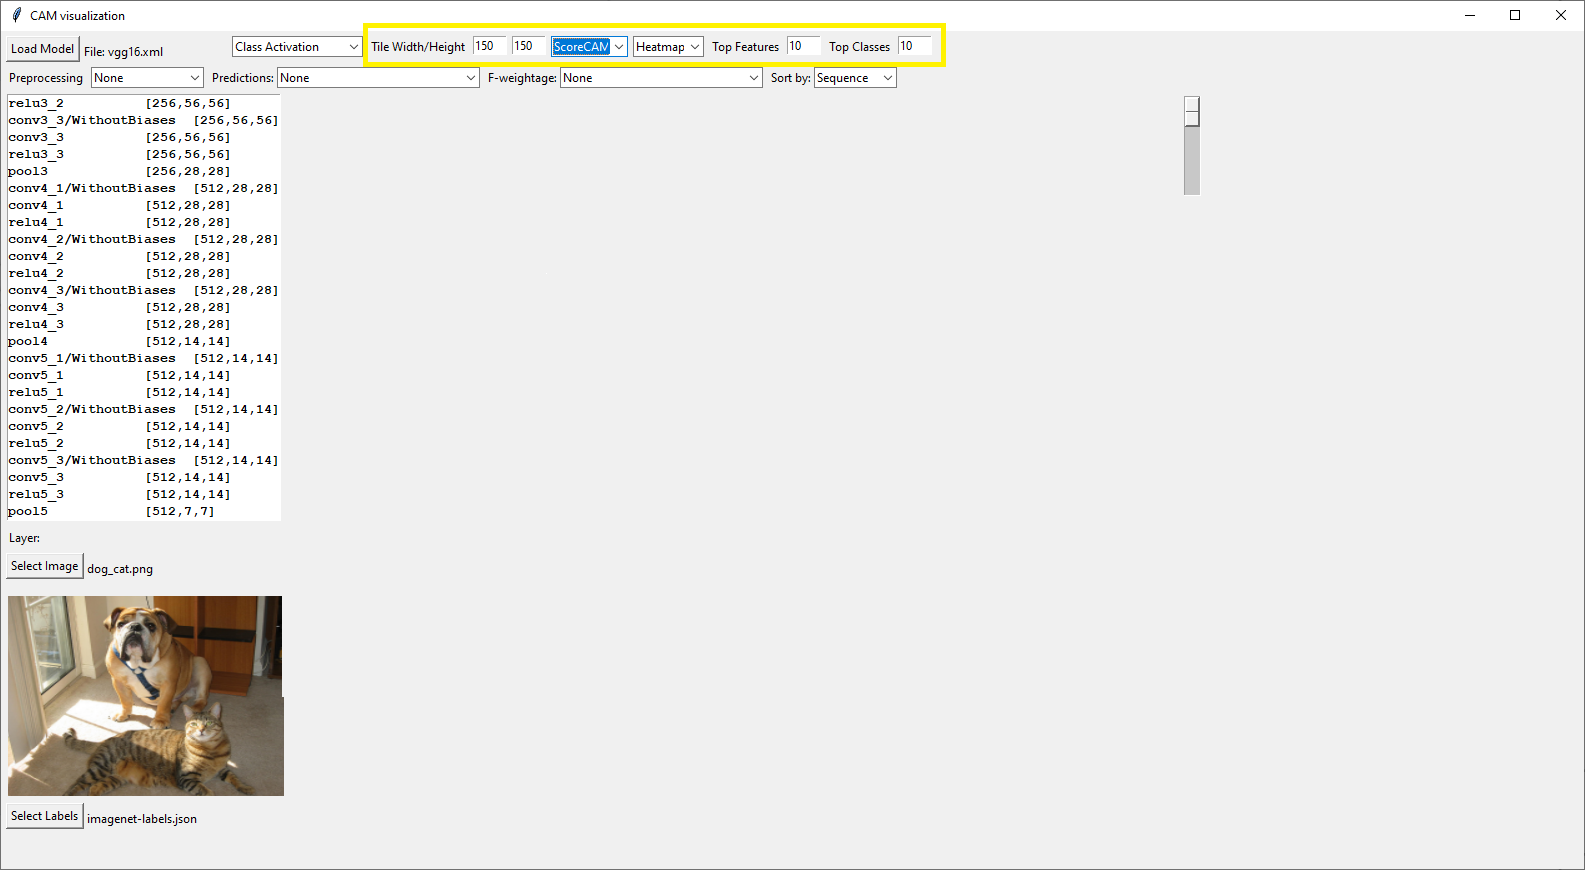
Figure 12: Select CAM Type
- Click on Layer (highlighted in screenshot):
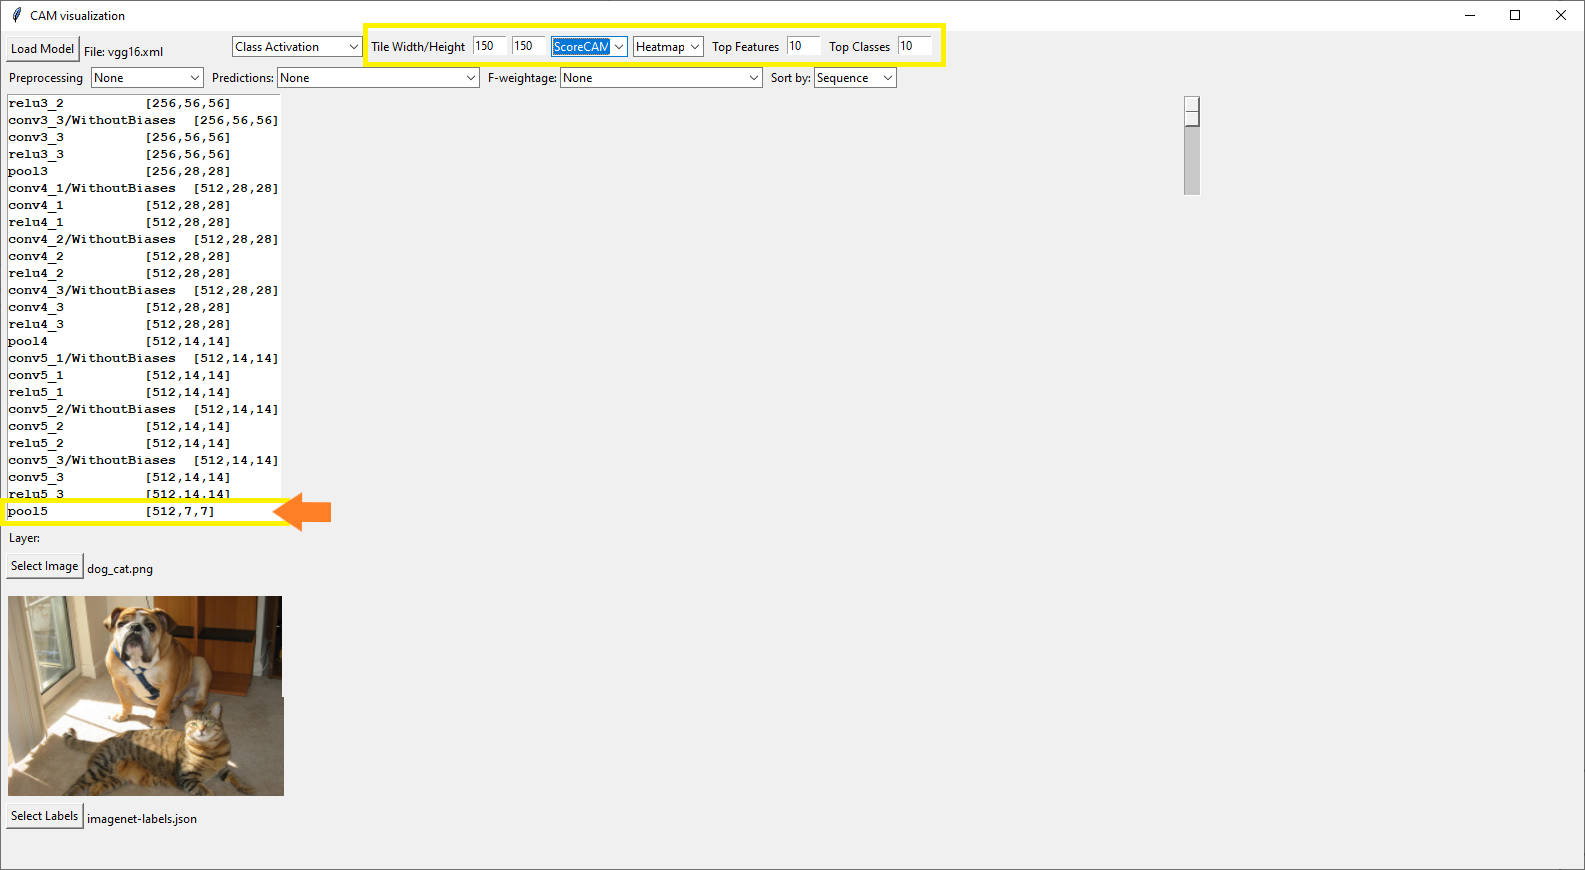
Figure 13: Click on Layer
- Use the scroll bar to view the visualizations.
- Sample output for Score-CAM selection
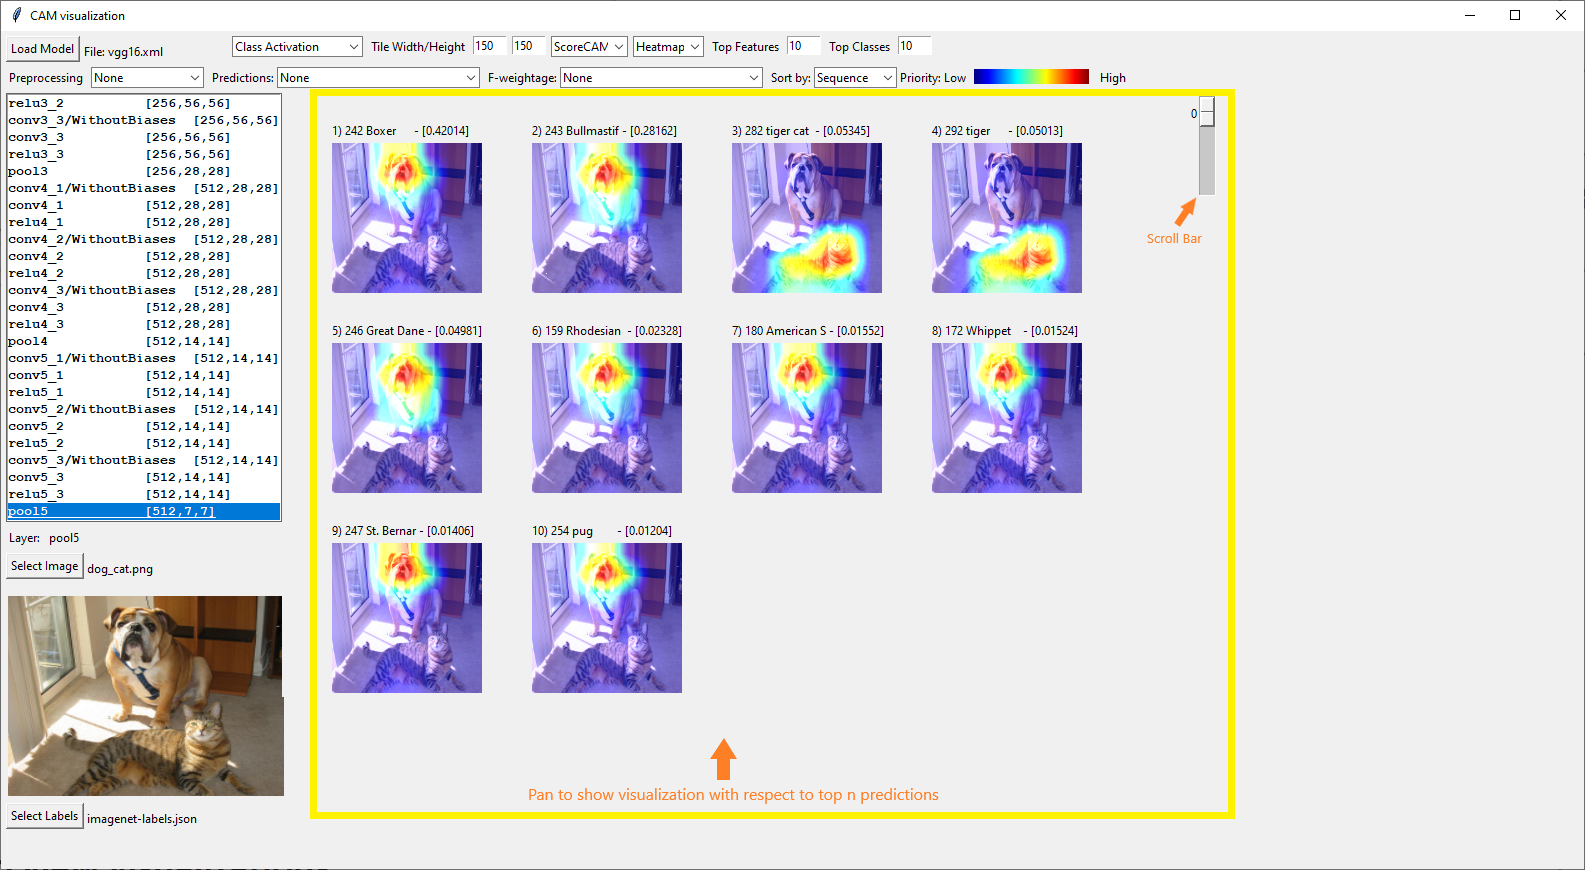
Figure 14: Sample Output of Score-CAM
- Sample output for Simple-CAM selection
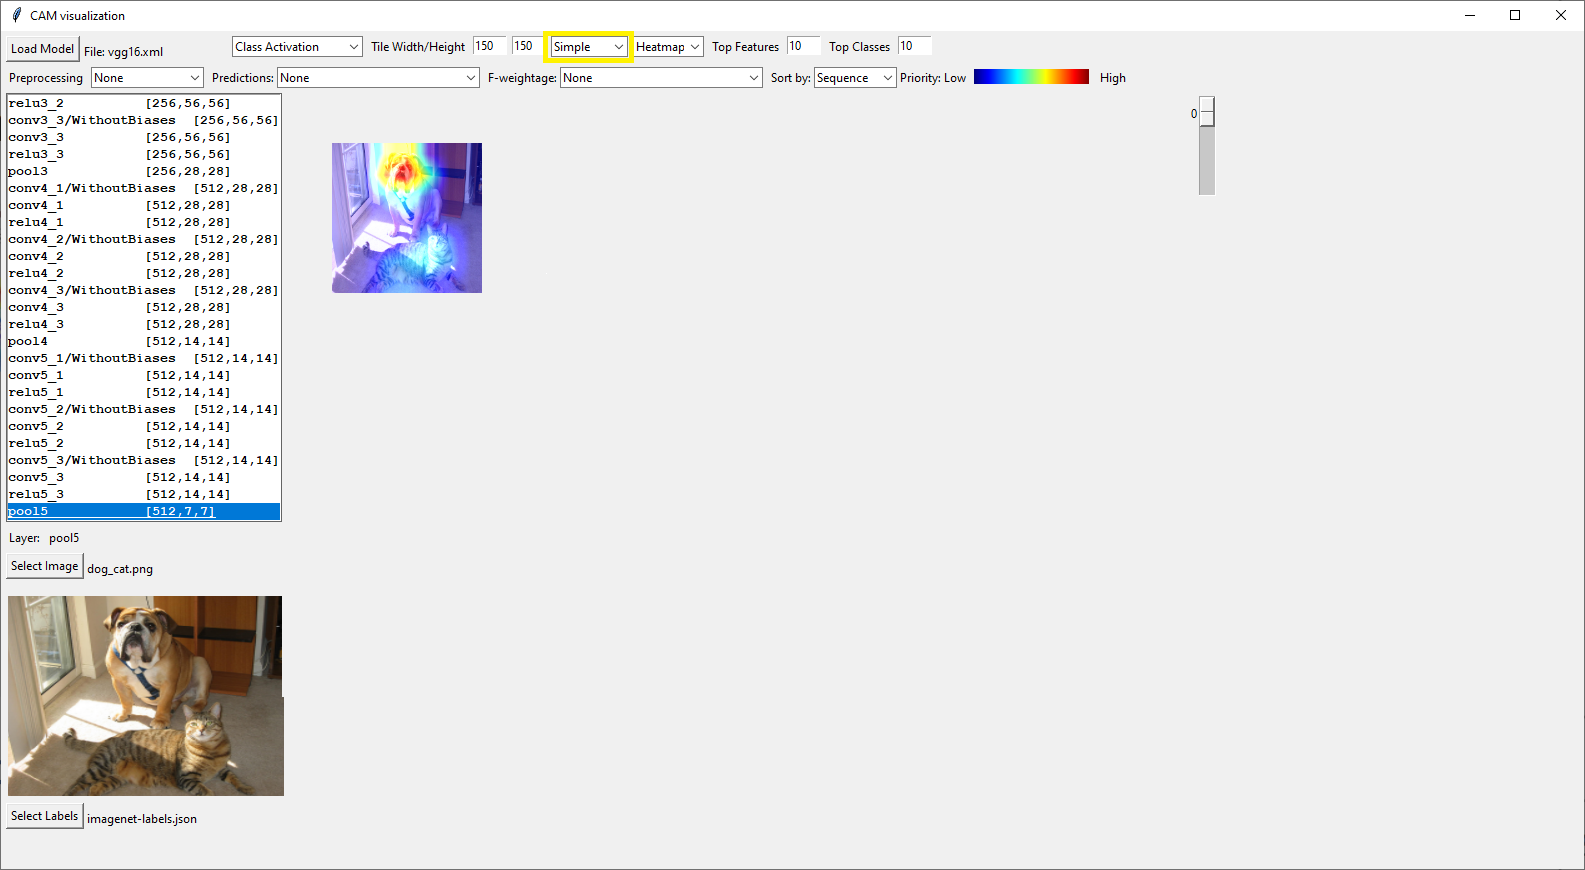
Figure 15: Sample Output of Simple-CAM
- Sample output for Score-CAM masked selection
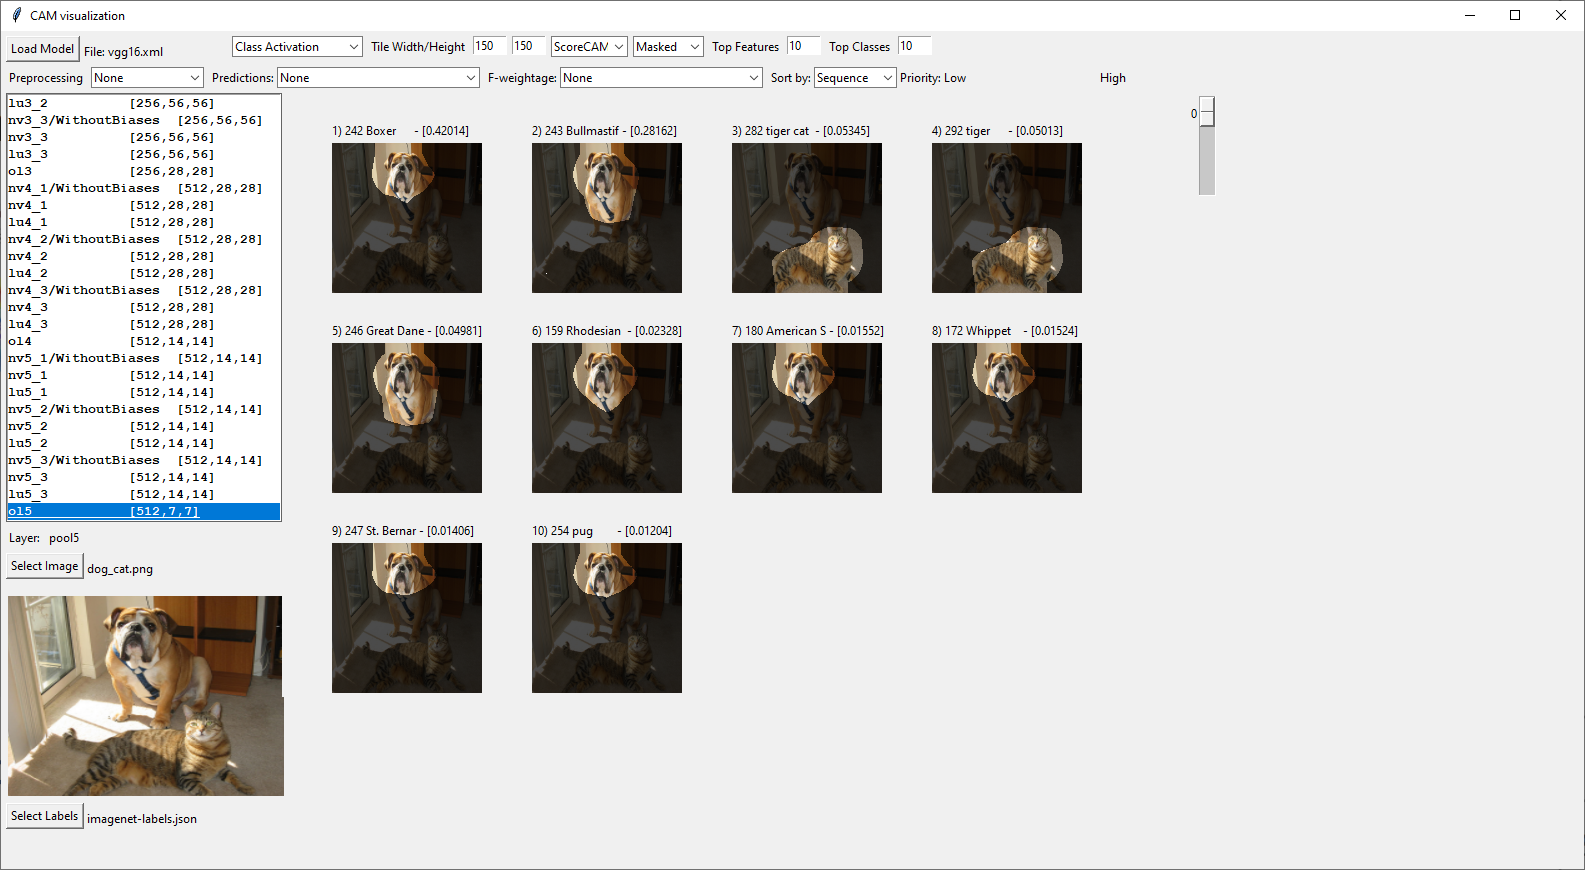
Figure 16: Sample Output of Score-CAM Masked
- Sample output for Score-CAM for TensorFlow model
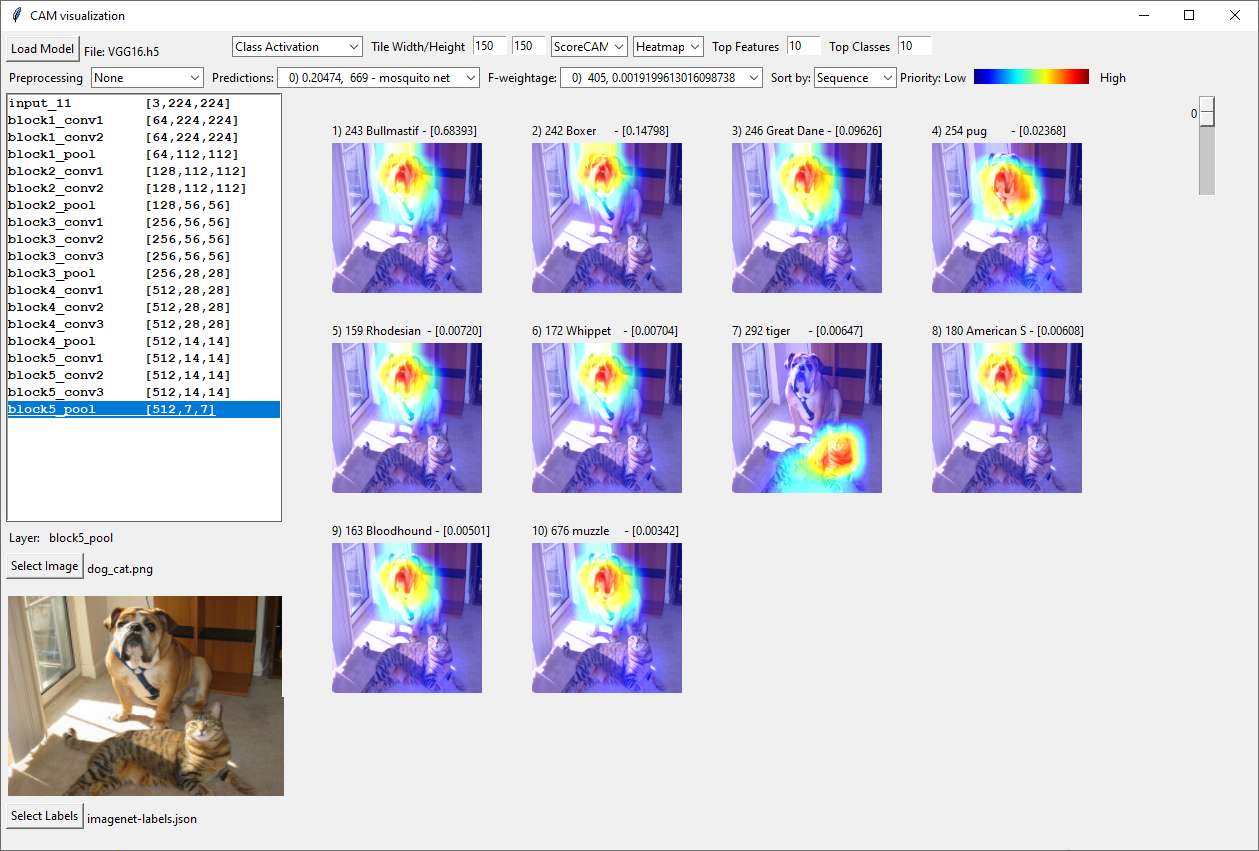
Figure 17: Sample Output of Score-CAM for TensorFlow Model
- Sample output for Grad-CAM for TensorFlow model
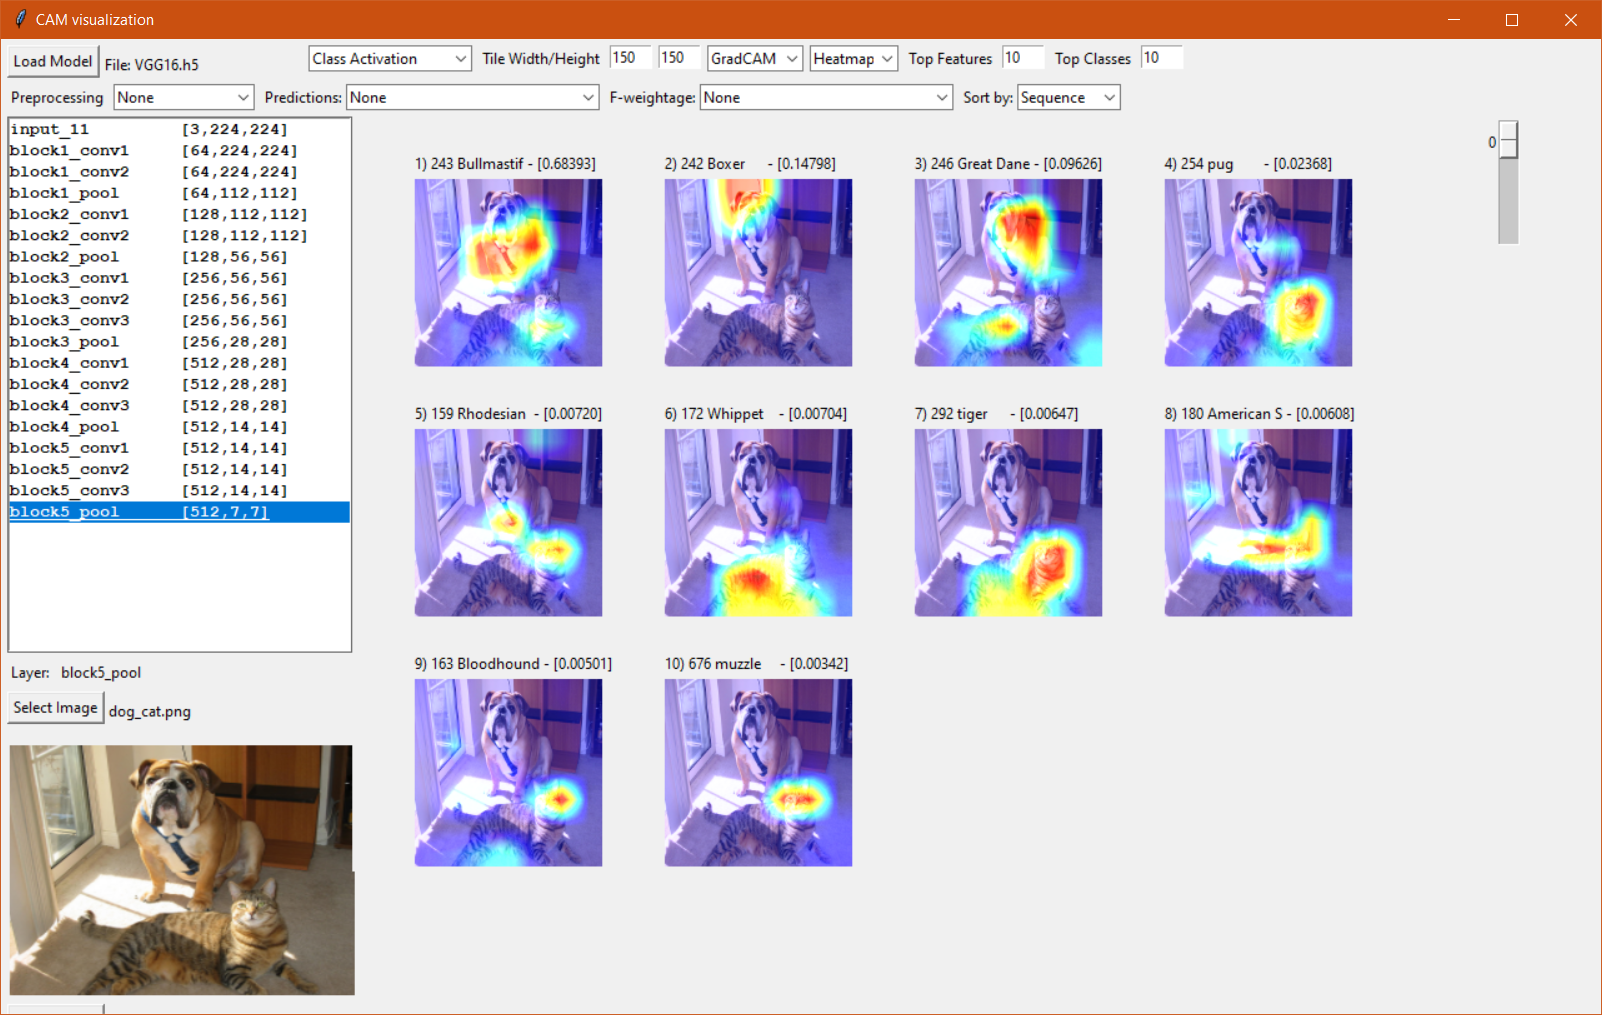
Figure 18: Sample Output of Grad-CAM for TensorFlow Model
- Sample output for Score-CAM selection
Run Inference with Feature Activations
- Follow the steps above, but instead select Feature Activation from the drop-down box.
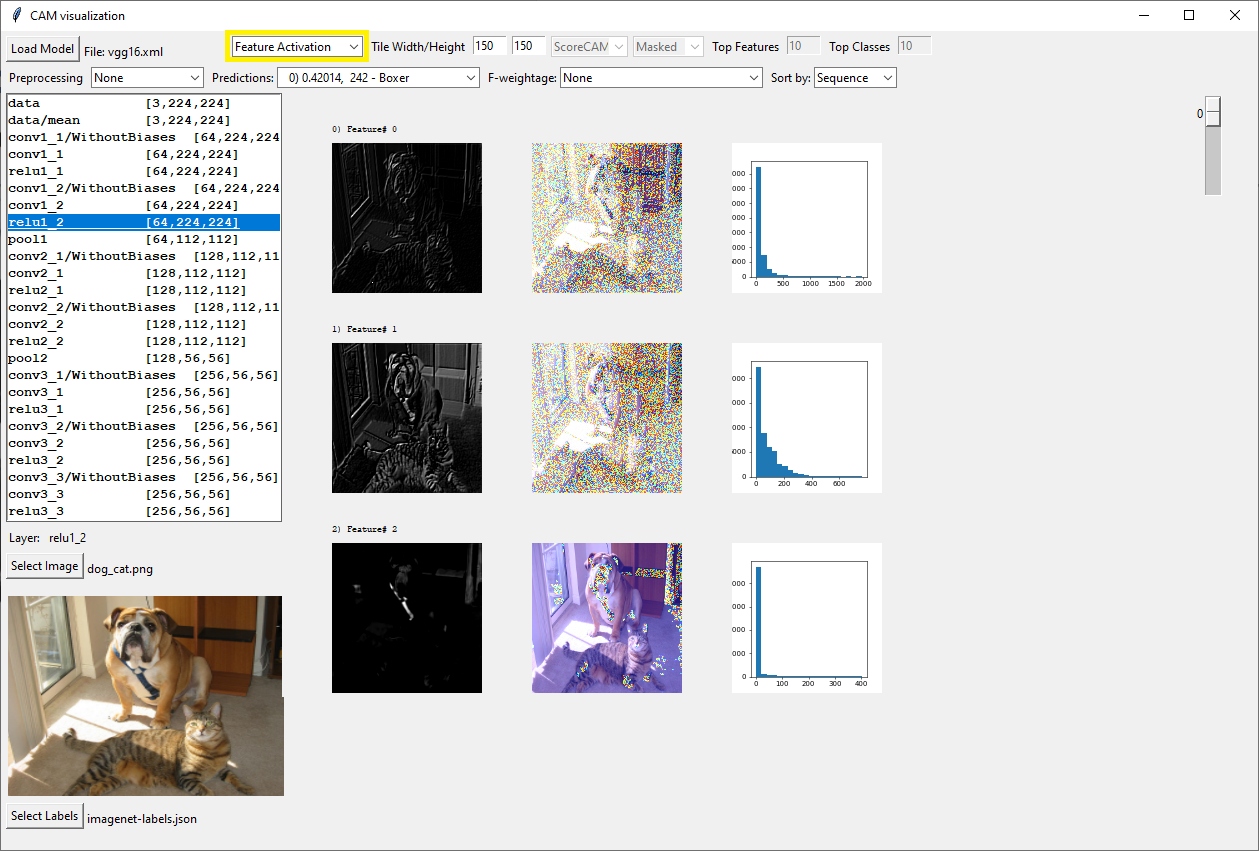
Figure 19: Select Feature Activation
- Check for Success. If it was successful, the results will be as follows for the class activation maps.

Figure 20: Check for Success
Use the Console
Start the application:
python camgui/ccamgui.py <arguments>
Examples using different arguments:
- List all the layers of the densenet-121 model:
python ccamgui.py -m public\densenet-121\FP16\densenet-121.xml -ll - Get heatmaps of SimpleCAM of layer input_9 of the EfficientNetB0 model and save it to a directory:
python ccamgui.py -m public\models\ir\EfficientNetB0.h5 -l input_9 -i tests\baseline_test_images\dog_cat.png -s savehere\EfficientNet -v heatmap -cm simple - Get heatmaps of ScoreCAM of final layer of the EfficientNetB0.h5 model with 8 top features and 20 top classes and save it to a directory:
$ python ccamgui.py -m public\models\ir\EfficientNetB0.h5 -i tests\baseline_test_images\dog_cat.png -s savehere -cm score -tf 8 -tc 20
Features
- Currently supported model formats:
- .xml
- .h5
|
Arguments |
Options |
Description |
Default action |
|||
|---|---|---|---|---|---|---|
|
-m, --model |
- |
Specify the path to the model |
Mandatory to specify |
|||
|
-ll, --list |
- |
List all the layers of the model |
- |
|||
|
-l, --layer |
- |
Used to specify a layer in the model |
Points to last layer |
|||
|
-cm, --cmethod |
simple, score |
Specify CAM Method |
simple |
|||
|
-i, --image |
- |
Path to input image |
- |
|||
|
-s, --save |
- |
Path to save the heatmaps |
If not provided, |
|||
|
-v, --visual |
mask, heatmap |
Specify the visual mode |
heatmap |
|||
|
-tf, --topfeatures |
- |
Number of features to predict in each class |
10 |
|||
|
-tc, --topclasses |
- |
Number of classes to predict. |
12 |
|||
|
-p, --pre |
None, tf, caffe, torch |
Preprocessing techniques |
None |
|||
NOTE: Console CAM-Visualizer currently does not support the following capabilities. Support for these capabilities is planned for a future release of the solution.
-
Feature activations
-
GradCAM heatmap method
-
Options to select custom image width/height selection
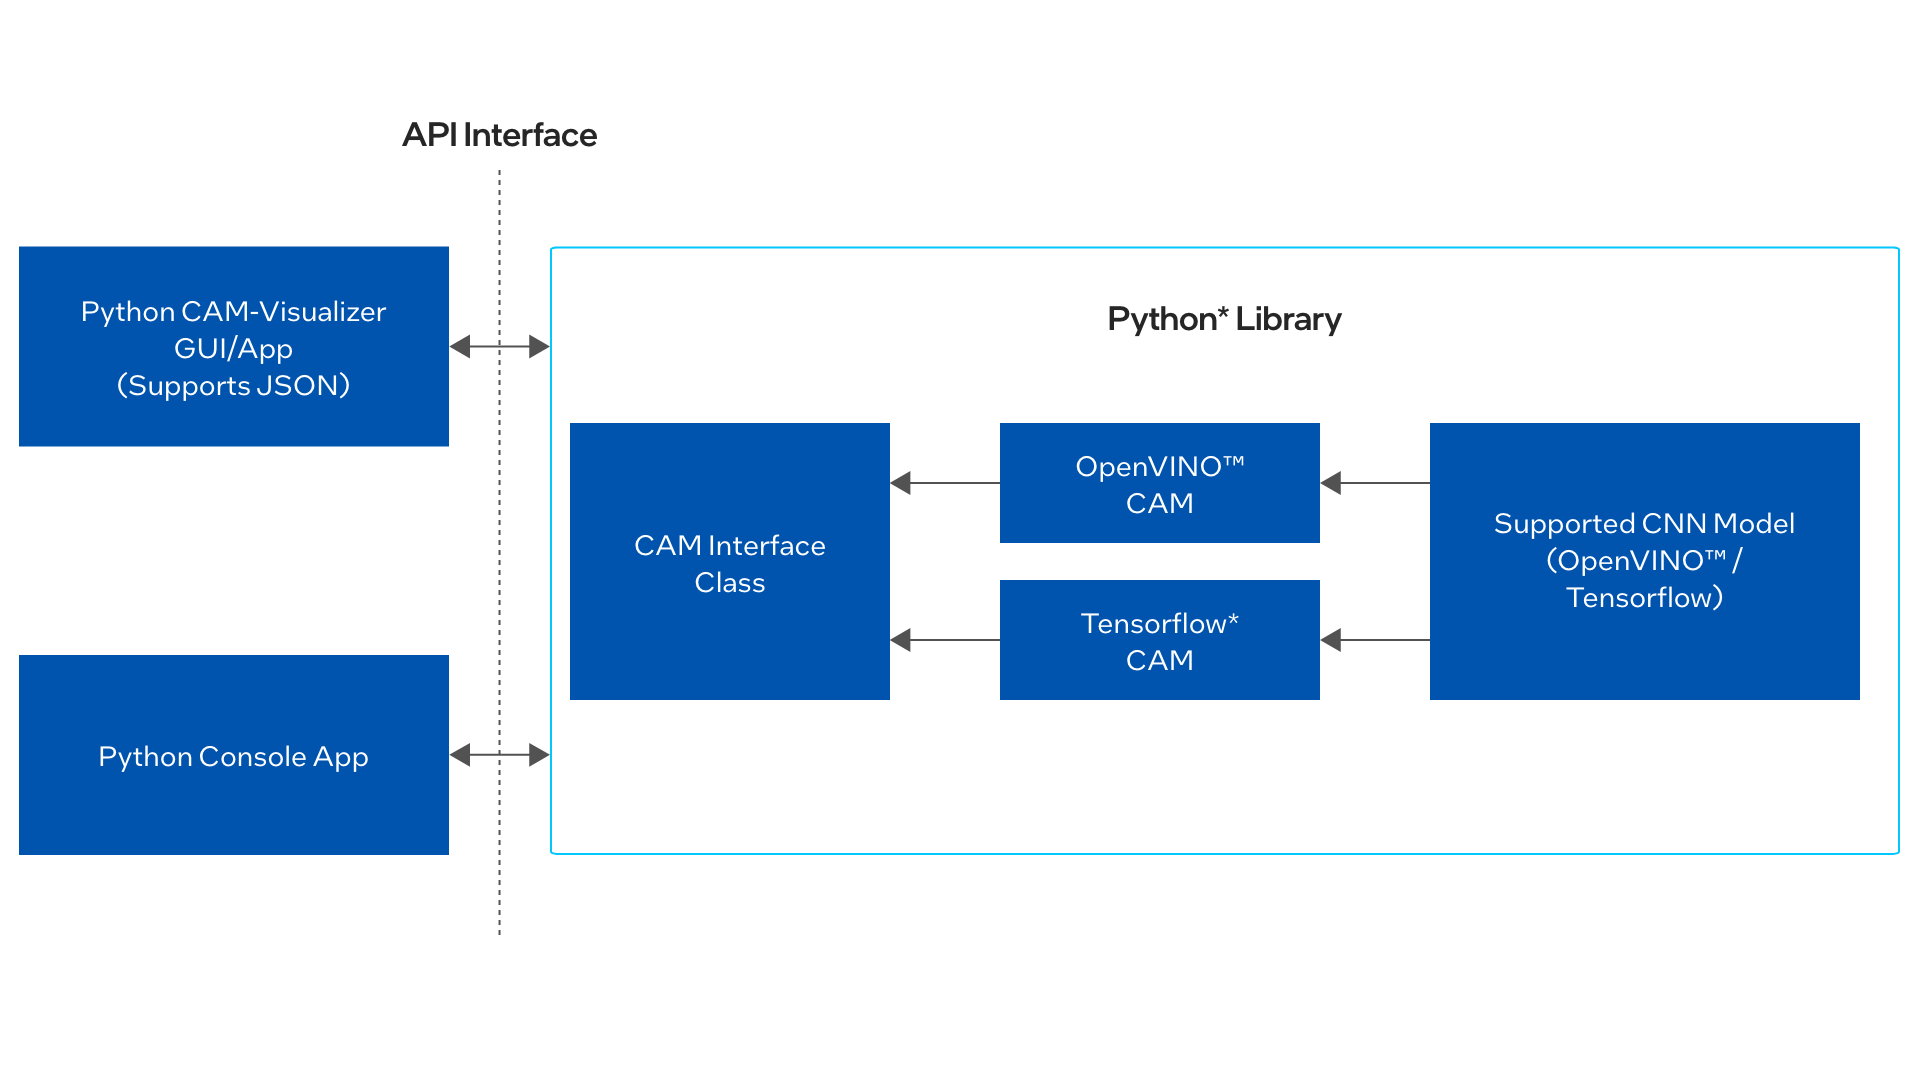
API
Navigate to the tutorials directory to find an example API use of CAM-Visualizer.
Build a Solution Based on the Product
You can leverage CAM-Visualizer for classification workloads in which CAM-Visualizer is able to identify the portions of the image where the model is looking to make a prediction.
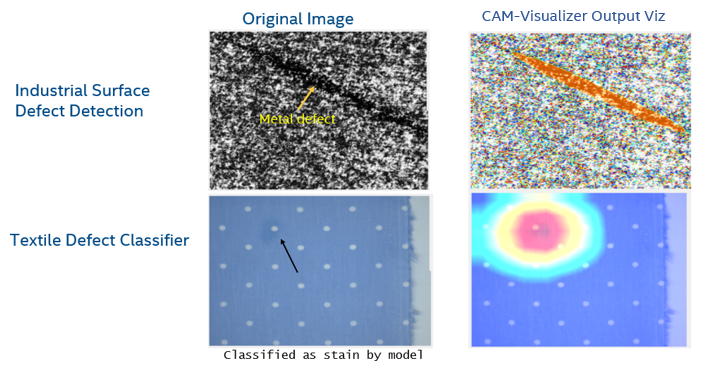
For example, the image below shows examples of applying CAM-Visualizer with an AI model to the Textile Defect Classification Reference Implementation. CAM-Visualizer is directly able to highlight the area of the stain associated with the classification. Similarly, the results taken from the CAM-Visualizer GUI on the Industrial Surface Defect Detection Reference Implementation in the image below, demonstrate the results of CAM-Visualizer for detection workloads.
Alternatively, the Cam-Visualizer API can be integrated in the source code of a product for use cases such as Industrial Surface Defect Detection. Saliency maps can be generated at a chosen cadence with the parameters of your choice, for example, layer selection.
CAM-Visualizer can help enable you to compare multiple models’ results to help diagnose which models are making incorrect predictions.
Summary and Next Steps
You successfully ran the CAM-Visualizer application and displayed the result using the Intel® Distribution of OpenVINO™ toolkit Inference Engine.
As a next step, you can integrate CAM-Visualizer into your application via the API.
Learn More
To continue learning, see the following guides and software resources:
Troubleshooting
Visualization Results Look Incorrect
If you do not see expected visualization results, take the following actions:
- Identify if the pre-processing mechanism needs to be adjusted in relation to the source network.
- Compare the results with another saliency map algorithm supported by the tool. For example, if you are using Score-CAM for Intel® Distribution of OpenVINO™ toolkit, compare with Simple-CAM. If a TensorFlow source network is available, compare with Grad-CAM.
- (Optional) Inspect the saliency maps for the other layers to identify consistencies between layers.
- You may also choose to inspect and modify the source code if the above actions are not working, in a scenario where you are using a custom model that requires modification of the implementation.
Incompatible .h5 File
CAM-Visualizer only supports TensorFlow models with .h5 format with embedded model architecture. Support for other TensorFlow formats such as .pb and .ckpt are planned for a future release.
Support Forum
If you're unable to resolve your issues, contact the Support Forum.